Wednesday, August 21, 2013

Making a claims-aware website in Visual Studio 2012

My company has been using LDAP authentication for all internal software for the longest time and we're now considering moving to a claims based approach. We've been more inclined lately to do so now that Azure website migration is part of our strategy.

 We have ADFS (2.0 I believe) but we haven't setup an apps to authenticate against it ... until today. 
The googles had a lot of articles on how to setup Secure Token Services (STS) and claims-aware websites but most of the articles and posts were using either VS 2008 or 2010. When I went to use the default VS templates specified, they were nowhere to be found.

Things you'll need:

The address of your ADFS server
An SSL certificate for your web application.  Here are instructions on how to do it if you have IIS 7.
IIS, it must be configured to serve up ASP.Net content (either on a server or your local workstation)


Here are the steps we took to get it working Visual Studio 2012:

1) Download the following C# Webforms project from MSDN.  (This step isn't necessary but it has code in it to list out the claims returned from ADFS already).

2) Setup your website in IIS and link your SSL certificate to it.  Point the base folder location to the WebApplication folder of the project from step 1 (if you chose to download it).  Now would also be a good time to make sure your Windows Firewall has inbound rules to allow port 443.

3) Install the latest version of Windows Identity Foundation SDK via the Web Platform Installer. This will also automatically install the Windows Identity Foundation (WIF) component.


4) In VS, right-click the web application and select "Identity and Access..."

5) Select to use a "business identity provider"

Then for the path to the STS metadata document enter in https://<your_adfs_server_address>/FederationMetadata/2007-06/FederationMetadata.xml
The full path is a convention that STS uses by default.

For the APP ID for your application enter whatever domain address is configured for your application in IIS from step 2.  Make sure it starts with "https".


6) Click the Configuration tab and make sure "Require HTTPS" is checked on.
For APP ID URI and for Audience URI enter the same value you did for your APP ID from the first tab.


7) After you click "Ok" it will make changes to your web.config file and will create a folder named "FederationMetadata" in the root folder of your application with an XML configuration file in it.

8) The "FederationMetdata" folder will not show up in your VS project so you'll want to show all files in the project and right-click it to include it so that it's under source control and will get deployed when you publish or however you deploy.

That's all you have to do for the web application.  The only thing left is to add the web application as a "Relying Party".  I'm kind of glossing over the steps for this part but once you're in the administration program for ADFS, it's fairly straight-forward and intuitive what you need to do.

When it asks for the URL for the relying party's metadata file, put in
https://myapp.dev.com (or whatever your app is).  It will figure out how to get to your Federation Metadata file by using the standard convention.


Thursday, April 18, 2013

Creating a basic Python app on Cloud 9 for use on Heroku

As part of our upcoming Code Wars competition in June, I've been working on creating services for multiple languages that will exist on various cloud hosting providers.  Python is one of the main languages we want to support this time around so I'm documenting my journey on creating a basic "web service" type app that will live on Heroku.

Create Cloud 9 app

Luckily Python is one of the languages supported by Cloud 9 so I didn't bother to actually install Python on my local machine.  When you create a new workspace you can select Python/Django as an option.

I deleted the hello-world.py file and created an app.py file to be used as the main program to run the web service.  I don't know that much about Django other than it is a close equivalent of Rails.  For this simple web service I decided to use something simpler than will just need to respond to a few url routes with a json response.

I found Bottle which involved pasting the contents of a single file into my project.  Here is a link to the Bottle website and here is a direct link to the python code you would need to copy and then paste into Cloud 9 as the file bottle.py.

Now for the actual app.py code contents:
# imports
import os
import json
from bottle import route, request

# routes
@route('/')
def index():
    return "Placeholder for Python app"
    
@route('/command', method='POST')
def index():
    status = json.loads(request.forms.get('status')) # can also use request.query.get
    players = status["players"]
    return json.dumps(status)

# start server and listen for requests
# for Cloud9 run(host=os.environ["OPENSHIFT_DIY_IP"], port=int(os.environ["PORT"]), debug=True)
run(host='0.0.0.0', port=int(os.environ["PORT"]), debug=True)

What's important to note is on line 18, the value used for the host variable on Cloud 9 is os.environ["OPENSHIFT_DIY_IP"].  A lot of people on StackOverflow were saying to just use os.environ["IP"] but that key did not exist for me when I tried it.

You'll notice line 18 is commented out in favor of line 19.  Line 18 is for testing out your app on Cloud 9 specifically, and line 19 is for when you're ready to deploy to Heroku.


Files needed for Heroku deployment

Heroku will look for 2 specific files when you deploy a Python app to it: Procfile and requirements.txt

For Procfile you will want to enter the following (assuming your main file is app.py):
web: python app.py

For requirements.txt you actually don't need anything in it, just create it as a blank file in the root folder.

From here you can init a new git repository, add all files to it, commit it, and then deploy to Heroku.  I always use the deploy tab on Cloud 9 (the hot air balloon icon on the left) to create my initial Heroku repository.  From there I use terminal to do the actual git deployment.

And that's it, from there you should have a python app that responds to requests!

Tuesday, March 26, 2013

Kronos frozen gyros kit

I do love me some good gyros.  Before I order one at a fast food joint I always check to make sure I can spot the spitfire grill behind the counter.  It's simple.  If I don't see one I don't order one because I know it just won't be any good.

I also have some theory about the kind of cutting or slicing apparatus they use to slice the meat.  I've seen some fully automatic shavers that look like the small face vacuum mounts for when you're trying to clean your curtains.  They seem really impressive on how they make quick, accurate, consistent cuts.  To me, nothing beats a traditional handheld long blade for slicing.  I like varying pieces of meat, it gives each bite more variety.

The last thing I notice is how dark the meat is before being sliced.  This usually doesn't stop me from ordering but I really like it when the edges are slightly crispy, almost even slightly burnt.  This does all sorts of things to the seasoning of the lamb.  Speaking of meat, is gyros meat really just straight up lamb?

To revert back a little, I really need to talk about the first thing I notice, and I mean before I even walk into a fast foot joint that sells gyros.  If they have the Kronos sign in the window I know it's all good.  That's the thumbs up sign that says "come in bro, we aren't going to microwave your meal for you."  I can't say I've done any official research but experience has taught me that if you don't have Kronos you don't have $@%#.


I was at the local Walmart the other day getting my car worked on so I was perusing the frozen food section to buy a little time.  I usually will check out the CPK section to see what pizzas they have.  Then it caught my eye. The gyros kit.  Now I've seen my share of gyros kits before, even tried a few when I was young and foolish and didn't think twice about desecrating my taste buds.  But this one had something different, it had the familiar red Kronos logo on it (along with a bunch of other gyros buzzwords that could put a smile on Tom Thibedau's face.


Despite a reasonably tasty looking cover picture, the kit consists of 3 primary things: Tzatziki sauce, 6 whole pitas, and roughly 18 meat slices cut as thin as bacon. :(  This was an immediate disappointment.  Bacon deserves its own blog post but I usually eat it by itself to fully appreciate the flavor and texture of it.  Putting 3 thin slices per gyros sandwich angers me almost as much as McDonalds trying to limit me to just 3 sauces for a 20 piece mcnuggets!  C'mon man!


Here you can see the 3 slices being prepared the best way that I could muster given I don't own any fancy kind of roasting devices.  When you try to pull the frozen meat slices apart they have a tendency to tear easily.


The whole process took so long to prepare that I just jumped into eating and forgot to take a photo of the entire gyros.  Notice how scant and lonely the innards look?  Would you send this back if you were at *name-your-favorite-gyros-greasepit-here*?  I know I would.

Taste: 3 out of 10
The sauce they give isn't too bad.  I'd recommend putting six slices of the meat per sandwich if you can swing it.  The taste of the meat, to paraphrase Simon Cowell, "I'm not jumping out of my chair but it was ok".  Also, you'll have to supply your own tomatoes and onions.

Value: 7 out of 10
The kit costs under $9 and can make anywhere from 2 to 6 sandwiches depending on how sparing your are with portions.  The average gyros at most grease pits is $5.

Bottom line: don't bother with frozen gyros, not even if you're desperate.

Friday, March 22, 2013

Getting the names of custom fields from Wordpress JSON API


This is the necessary Wordpress plugin modification so that the list of custom fields can be pulled from Wordpress via the JSON API.

First you need to add the JSON API plugin to your Wordpress site.
Then go to Plugins -> JSON API -> Edit
Open the json-api/controllers/core.php file and add the following code as the last functions in the class.

function get_acf_fields()
{
  global $json_api;
  extract($json_api->query->get(array('id', 'slug', 'page_id', 'page_slug', 'children')));

  // vars
  $return = array();
  $keys = get_post_custom_keys($id);

  if($keys)
  {
    foreach($keys as $key)
    {
      if(strpos($key, 'field_') !== false)
      {
        $field = $this->get_acf_field($key, $id);
        $return[$field['order_no']] = $field;
      }
    }
   
    ksort($return);
  }

  // return fields
  return $return; 
}

function get_acf_field($field_name, $post_id = false)
{
  $post_id = $post_id ? $post_id : $this->get_post_meta_post_id($field_name);
  $field = get_post_meta($post_id, $field_name, true);
  return $field; 
}

Thursday, September 13, 2012

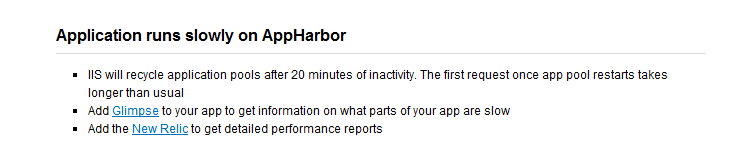
Workaround for AppHarbor's 20 minute app pool recycling

AppHarbor is an amazing service put in place for us .Net developers.  Free single processor web instances, built-in SSL, continuous builds with unit testing, and git deployment.  One big downside to their service, however, is that their servers will recycle the app pools after 20 minutes of inactivity.

(Taken from AppHarbor's FAQ page)

This does two negative things to your website.  1) It will timeout any user sessions regardless of what you specify the default timeout to be (again this assumes they're inactive for at least 20 minutes), and 2) it will unload the application completely so that when a user goes to your website, it has to go through all of the initial application load and startup events all over again (for my site this would usually take up to 15 seconds until the page responded).

So it seems the best option to solve this issue is to ping your website every 19 minutes.  But how do you do that with a solution that happens automatically, doesn't depend on any person or local machine with internet, and is cost-effective?

I found a free site monitoring tool called StatusCake that I'm now happily using to ping my website in 15 minute intervals.


I also tried out StillAlive which is an official AppHarbor addon that is free with limited functionality.  The main problem being it only allows you to make a call every 4 hours under the free plan.

Monitor.us is another free service that has tons of features that I looked into.  What I found was that StatusCake was a lot simpler to setup and manage.  Also, the lowest interval I remember seeing was 30 minutes but I could be wrong.

Thursday, March 22, 2012

Using ELMAH with Custom Errors turned on

This article specifically addresses handling uncaught exceptions in your web application. ELMAH can be plugged in pretty quickly with almost all of your changes happening in your web.config and global.asax.cs files.

Here is a slimmed down web.config file. When a 404 error occurs, it will not be logged to Elmah and the user will be redirected to a custom "Not Found" page. All other exceptions will be logged by Elmah and the user is redirected to a custom error page. To view the list of logged exceptions, the url is http://(yoursite)/elmah.axd (note that elmah.axd does not physically exist anywhere). Also, IIS will deny users that are not part of the "Developers" group to see the log page.
<?xml version="1.0"?>
<configuration>
  
  <configSections>
    <sectionGroup name="elmah">
      <section name="security" requirePermission="false" type="Elmah.SecuritySectionHandler, Elmah"/>
      <section name="errorLog" requirePermission="false" type="Elmah.ErrorLogSectionHandler, Elmah" />
      <section name="errorFilter" requirePermission="false" type="Elmah.ErrorFilterSectionHandler, Elmah"/>
    </sectionGroup>
  </configSections>

  <elmah>
    <security allowRemoteAccess="yes" />
    <errorLog type="Elmah.SqlErrorLog, Elmah" connectionStringName="Elmah" />
    <errorFilter>
      <test>
        <or>
          <equal binding="HttpStatusCode" value="404" type="Int32" />
          <regex binding="BaseException.Message" pattern="The file '/[^']+' does not exist" />
        </or>
      </test>
    </errorFilter>
  </elmah>
  
  <system.web>
    <customErrors mode="On" defaultRedirect="~/Home/Error">
      <error statusCode="404" redirect="/Home/NotFound" />
    </customErrors>
    <httpModules>
      <add name="ErrorLog" type="Elmah.ErrorLogModule, Elmah"/>
      <add name="ErrorFilter" type="Elmah.ErrorFilterModule, Elmah"/>
    </httpModules>
      <httpHandlers>
        <add verb="POST,GET,HEAD" path="elmah.axd" type="Elmah.ErrorLogPageFactory, Elmah" />
      </httpHandlers>
  </system.web>

  <location path="elmah.axd">
    <system.web>
      <authorization>
        <allow roles="Developers"/>
        <deny users="*" />
      </authorization>
    </system.web>
  </location>

</configuration>


In global.asax.cs I commented out the filter for the HandleErrorAttribute so that Elmah would handle the exceptions.
public static void RegisterGlobalFilters(GlobalFilterCollection filters)
{
    // Commented out so that web.config can have customErrors="true" and still let Elmah handle exceptions
    //filters.Add(new HandleErrorAttribute());
}


So now when I bring up my elmah.axd page I don't see 404 errors when the browser is looking for the favicon.ico file which I was seeing a lot of previously.

Friday, March 16, 2012

Setting up a Color Picker for Sublime Text 2 (on Windows)

Sublime Text 2. You already know so I don't need to say it. Anywho, in Visual Studio one of my favorite extensions is devColor for picking hex colors in my stylesheets. In Sublime Text 2 you need to install one, it's not there by default sadly.

Here are instructions on how to do it step by step.
  1. Fire up Sublime Text 2
  2. Press CTRL+` (the key above the TAB key)
  3. You'll see a console window take up the bottom portion of the window. Paste the following block of code there
  4. import urllib2,os; pf='Package Control.sublime-package'; ipp=sublime.installed_packages_path(); os.makedirs(ipp) if not os.path.exists(ipp) else None; urllib2.install_opener(urllib2.build_opener(urllib2.ProxyHandler())); open(os.path.join(ipp,pf),'wb').write(urllib2.urlopen('http://sublime.wbond.net/'+pf.replace(' ','%20')).read()); print 'Please restart Sublime Text to finish installation'
    (This will install the Sublime Text 2 Package Control system which is similar to Gem, NuGet, NPM, etc.)
  5. Close Sublime Text and reopen it
  6. Press CTRL+SHIFT+P to open the Command Palette
  7. Start typing in "Package" and select the Package Control: Install Package option and hit Enter
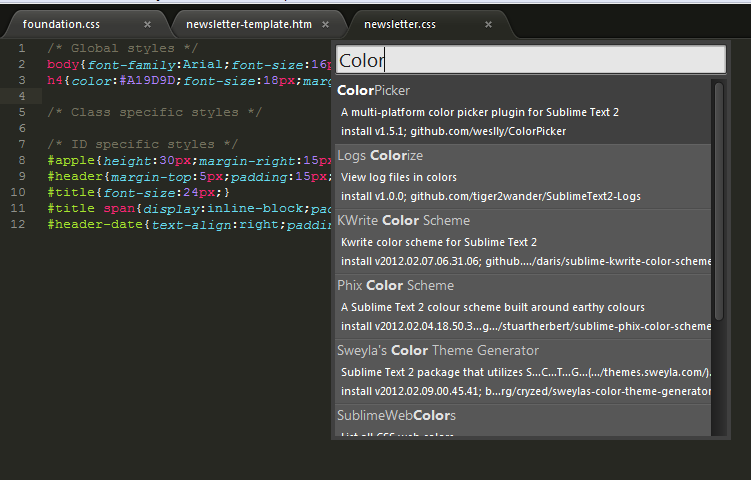
  8. The dialog changes to a list of available packages. Type in "Color" and select ColorPicker
    (Credit goes out to Weslley Honorato for creating the package)
  9. No restart of Sublime required this time around. It's ready to use
  10. Open a stylesheet or an area where you want to insert a hex color
  11. Press CTRL+SHIFT+C to bring up the color selection dialog
  12. That's it!